Motor Rebuild
Well the motor had been going very well, maybe not fantastic, but certainly not bad for a largely unmolested 24 year old. Good compression, easy starting, no real problems. Except the smoke… it was definitely burning oil. And the front head has a couple of broken fins to repair, and the exhaust ring kept working loose… Given that the compression was good, and that the bike had been standing for years, I decided the oil problem was probably the valve guide oil seals. Except that when Tony Brancato had a look last year, he told me that three of the guides had no seals…
Asking questions of the two intermediate owners, it seems three of the guides were replaced at sometime with a homemade design based on the Guzzi principle of using a scraper. They’d been working well when the bike was running before. Given that they were unlikely to have failed while the bike was standing still, the oil burning was probably then down to the one standard guide left, with a petrified original seal. Why three??
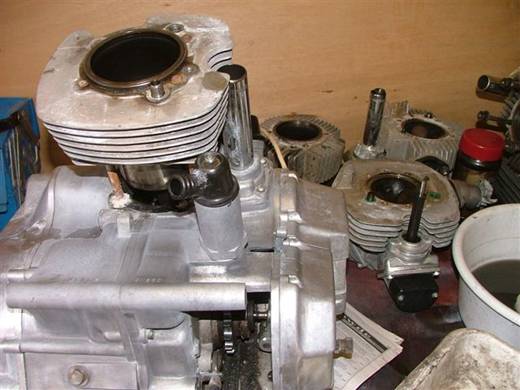
Anyway, given all that, the heads had to come off. And while I was doing that, might as well lift the barrels, get the heads and barrels cleaned up, along with the bottom end cases.
The heads popped off easy enough, and everything looks good. Lifting the barrels reveals two pistons which are in really good shape… the original machining marks are still visible all over them.
 I get
a quote from Nigel Lacey for redoing the old SSD heads (new guides, recut
seats, fix threads) about £600. About the same time, a set of fully rebuilt
heads appeared on ebay with big valves in… I grabbed them for £504… Score!
I get
a quote from Nigel Lacey for redoing the old SSD heads (new guides, recut
seats, fix threads) about £600. About the same time, a set of fully rebuilt
heads appeared on ebay with big valves in… I grabbed them for £504… Score!
Then I grabbed a rod and wiggled it… and the small end moves about 3mm sideways. I ask questions of the knowledgeable guys on the mailing lists and get answers from ‘quite normal’ to ‘strip it now’. The specialists, Brancato, Paul K, etc. also give differing information, however everyone knows the big ends on these things go for fun, and I can’t bear the thought of putting it back together and knocking a big end out straight away.
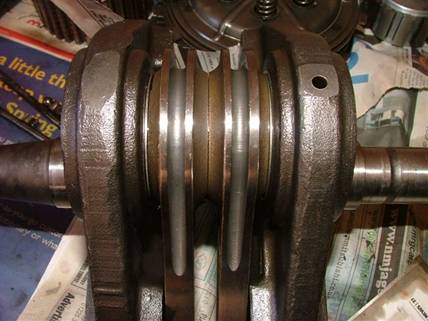
So, one Saturday after being quoted “about £2000” to strip and rebuild the bottom end by Tony B, I took a deep breath, pulled the bottom end apart and took the crank out. Good job I did. The right side thrust washer appears to be ‘gone’… no sign of it anywhere… except for a few random bits of metal in the sump. Side play on the rods is 1.35mm. Ducati builds them to 0.25-0.50, and sets the wear limit at 0.8mm. I guess it’s gone then.
There are various options for rebuilding the big end. All involve a big press to push it apart and new bits… The Ducati recommended method is remove crankpin, conrods, thrust washers, etc. throw them all in the bin, and replace with new items. About £900 in new parts, and they don’t have the right items in stock, only S2 units. There are a couple of other options… a similar set by Carillo is stronger, but needs rebalancing afterwards. A couple of aftermarket, original type sets exist and are a little cheaper, but apparently can cause problems in assembly.
I hated the idea of throwing my rods away. They’ve
been in there from new, and there’s nothing wrong with them except possibly the
big end bearing surface. Throwing the whole thing away to replace a bearing
seems a bit inefficient to me. Alpha bearings (and apparently Vee Two in
Then, Peter Koren of B'heads suggested I talk to Don
Godden Engineering (
He says the reason they fail in the Ducati is that they are set up at the factory to INAs recommended clearance of 1-1.5 thou. At that clearance, his V-twin knocks them out all the time. They noticed the ones set up at 1.5 lasted longer than those at 1.0, so tried 2.0, and then 2.5... At 2.5 they make a little more noise, but last for ever. For a road bike he'd recommend 2.0
Took a day off work (on my way to
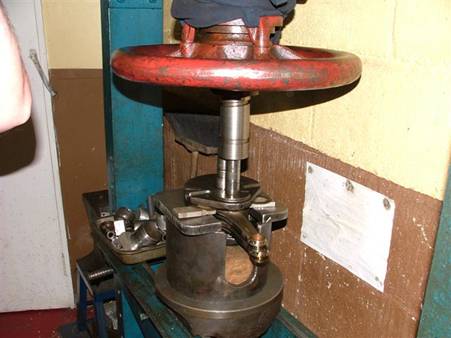
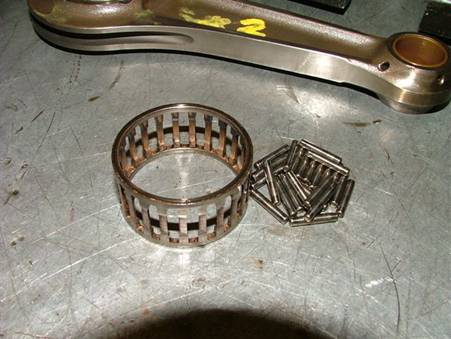
He has a quick look at the crank, sticks it on v blocks and proves it’s straight, the shoves it in a big press and pushes the pin out. Everything then comes loose. Very obvious is the worn thrust washer, which is there, just very, very thin. Then there’s the crank pin with big grooves in. And the worn cages. And one rod with half the width of the bearing surface worn away… I guess it’s gone then…
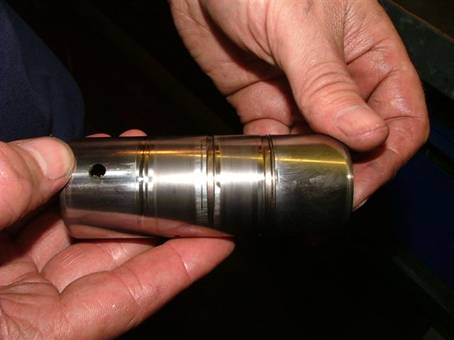
 One
new crankpin, very slightly stepped.
One
new crankpin, very slightly stepped.
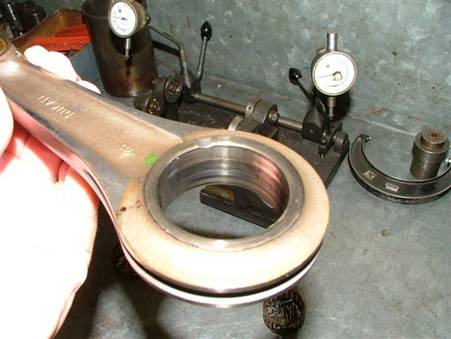
Hone a new surface into the good rod.
Bore out the damaged rod and press in a hardened steel insert. Hone to match the good one.
New bearings, cages and thrust washers. All set up with 2 thou clearance, and pressed back together.
And while he’s at it, 1mm increase in the radius of the valve pockets in the pistons to clear my new valves.
Total bill was £400 plus postage. Less than half the price of the wrong rod kit from Ducati. The new bits look fantastic, including the ‘Godden’ stamped into the end of the crankpin.
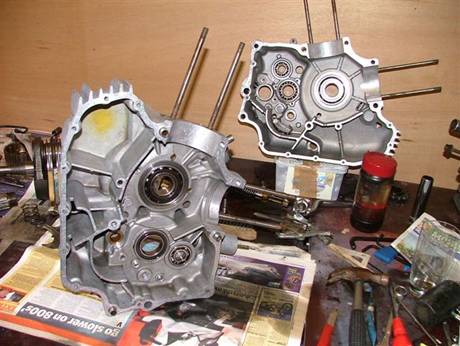
With the crank out, I had a chance to have a look at everything else in the bottom end. The gearbox, oil pump, bevel gears etc. all looked perfect, but one of the gearbox bearings was a bit rough. I figured there was nothing for it but to replace them all, so stripped the gearbox out and knocked out all the case bearings. One of them, being into a blind hole, needs a special extraction tool. I found a local gearbox specialist in a back alley 200m from my office that had one. He pulled it out for me in 30 seconds flat and waved me off with no charge. Nice chap.
The cases were cleaned up with a chemical concoction called Swarfega metal restorer, or something like that. It’s a pretty viscious acidic substance, and is supposed to be used diluted, but actually works if you use it neat… I suppose in retrospect I should have had them blasted while I had them apart, but I didn’t, so there.
A new set of bearings, including the correct mains,
came from an internet supplier for £100. They tapped in with no issues, and I
set about rebuilding the bottom end, or would have if I’d had gaskets. I’d ordered
them from Kamna in
Finally the gasket set arrives from
I had a bit of a disaster putting the bottom end together. For some reason I haven’t yet worked out, I put the crank in the wrong way round. Just plain not thinking, I guess. When I took it out again, one of the new mains came with it, because in a moment of madness I’d loctited it to the crank. The easiest way to reverse the crank was to pop out the other main bearing and put it in the other side. The only problem being that my crankshaft endfloat shims are now on the timing side of the crank. I’ve thought about this quite hard, and can’t find a reason why it would matter, so it’s stayed that way!
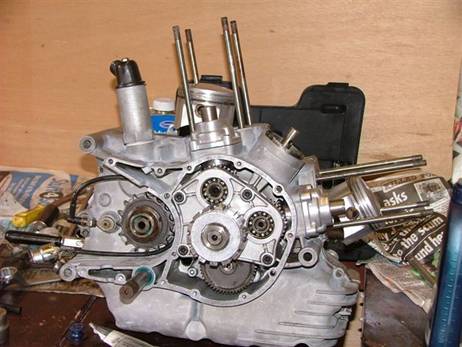
Bottom end finished, the motor sat on the bench for about three months until I got around to doing the barrels. They were cleaned up, deglazed, and fitted last week. The new gaskets didn’t fit and had to be trimmed. Here’s hoping it doesn’t piss oil out.
Heads next, and I picked up the rear one and checked over the clearances. Perfect. I was going to pull the rockers out and change the valve seals, but (oh, joy) there are no seals. I assume that the seals are the internal O ring type and as such should be a bit oily and therefore not all dried out and nasty. All guesswork, but that’s the way it’s staying. I was about to bolt it onto the motor when I noticed that the rubbers on the inlets have been slotted… the carb studs are the narrow spacing type… the heads must’ve been made from the old narrow port, 32mm carb jobbies. I have a choice, file slots in my inlet stubs (which I really don’t want to do) or move the studs (which I really, really don’t want to do). The ideal solution woul be to take a spare set of stubs and modify them to suit the new heads, leaving my originals intact. And guess who sold his spare set of manifolds about 6 weeks ago?
If the above seems to have been a continuous process, that’s because I’ve written it in one or two sessions. However, the actual work took a lot longer. Lack of a suitable working space, cold, miserable weather and general depression and disillusionment meant that everything has been done in one or two hour blasts with six week gaps in the middle. As I write this I’m yet to decide how to solve the head inlet stubs issue, so haven’t done anything for a couple of weeks… It’s currently mid January, and I really intend to ride this again this summer, so it’s about time to extract digit again.